Part 1
Click here for Part 2Here are some pictures of the 1970 Honda SL 175 Motorsport motorcycle that I am rejuvenating. It entered service in 1970 when Don bought it new, and drove for about 4200 miles in 6 years... At least that is when the last license tag and inspection stickers were dated. It essentially hasn't been run in almost 30 years, and thus it has several indications of disaster.
4-2008 Update: Because this page is so old, I've learned quite a bit since back when I first wrote it. I've gone back to re-read the old pages to correct information as neccesary. For example, I've since learned that Don didn't buy it new, but rather he was the second owner. He purchased it from the original owner when it was less than a year old.
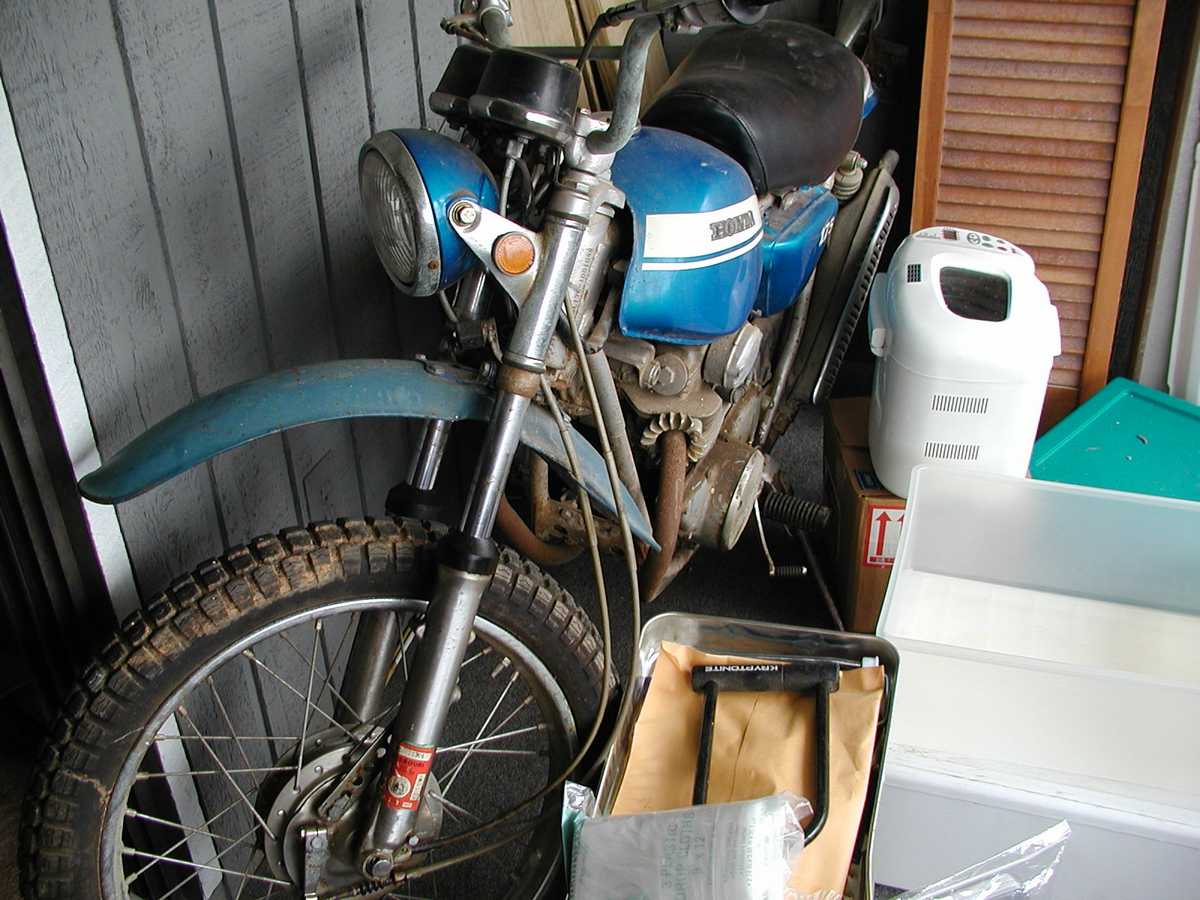
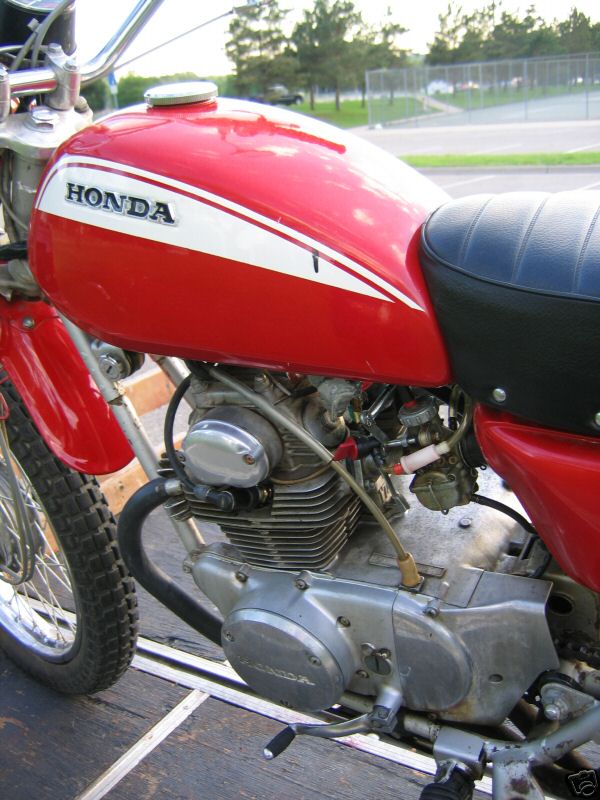
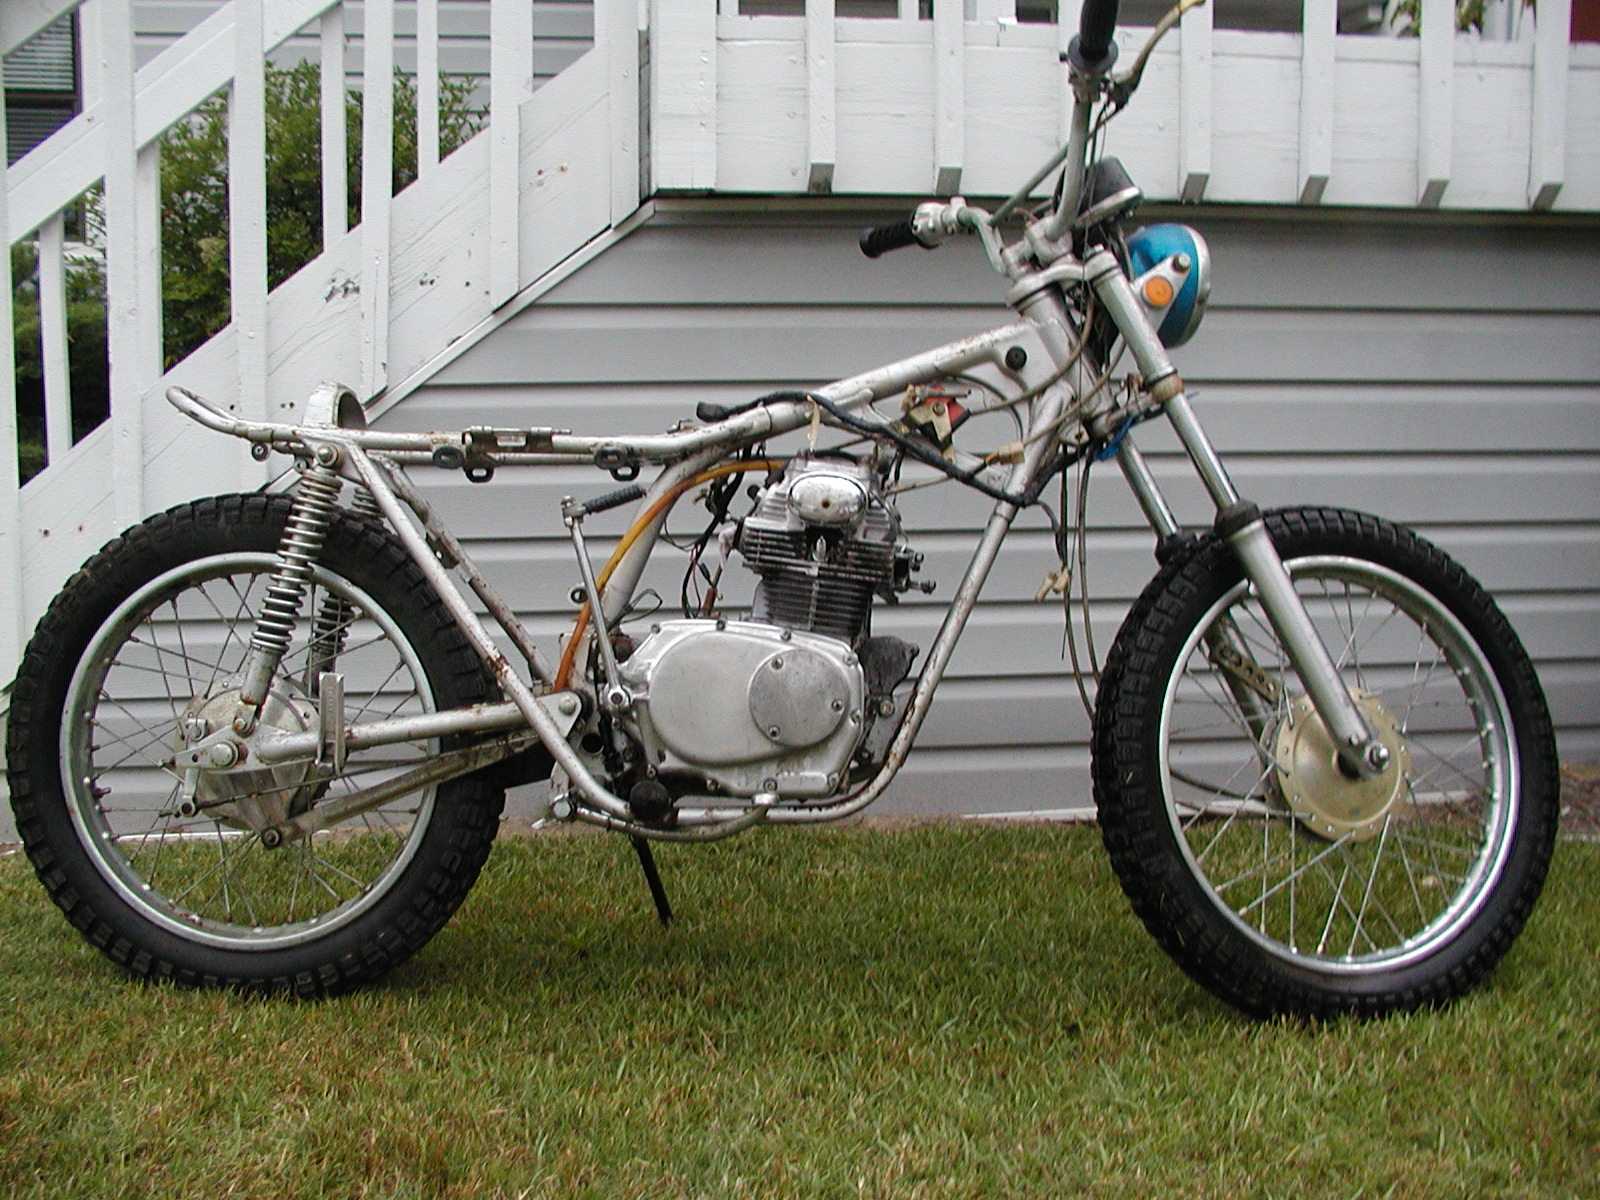
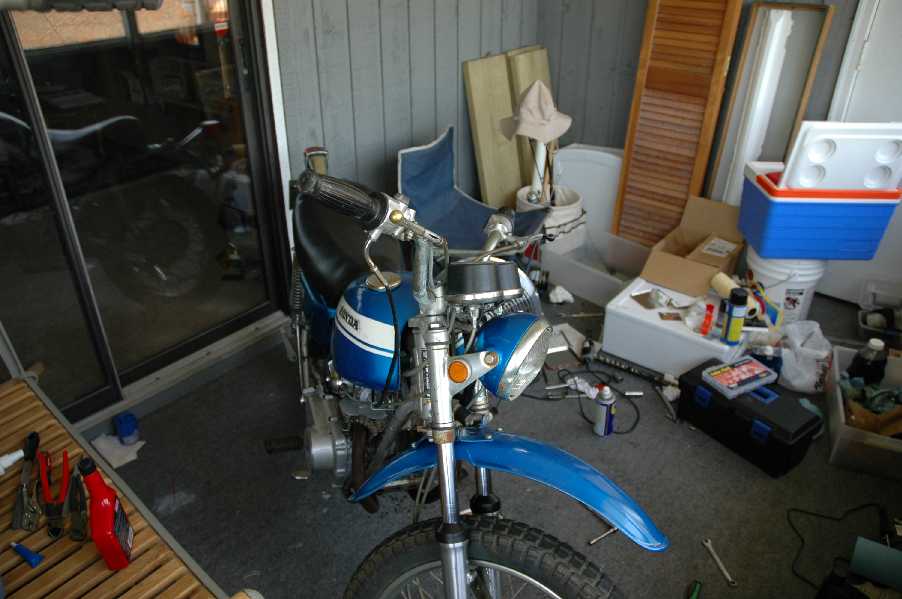
But, it has been inside for those 30 years, so the exterior deterioration isn't too bad yet. The engine turns freely, and it has had oil in it for all of this time. Isn't it sounding better already? This first two pictures are of the motorcycle exactly as I found it, in the back of the tool shed. The second two are just after I moved it into the current work area.

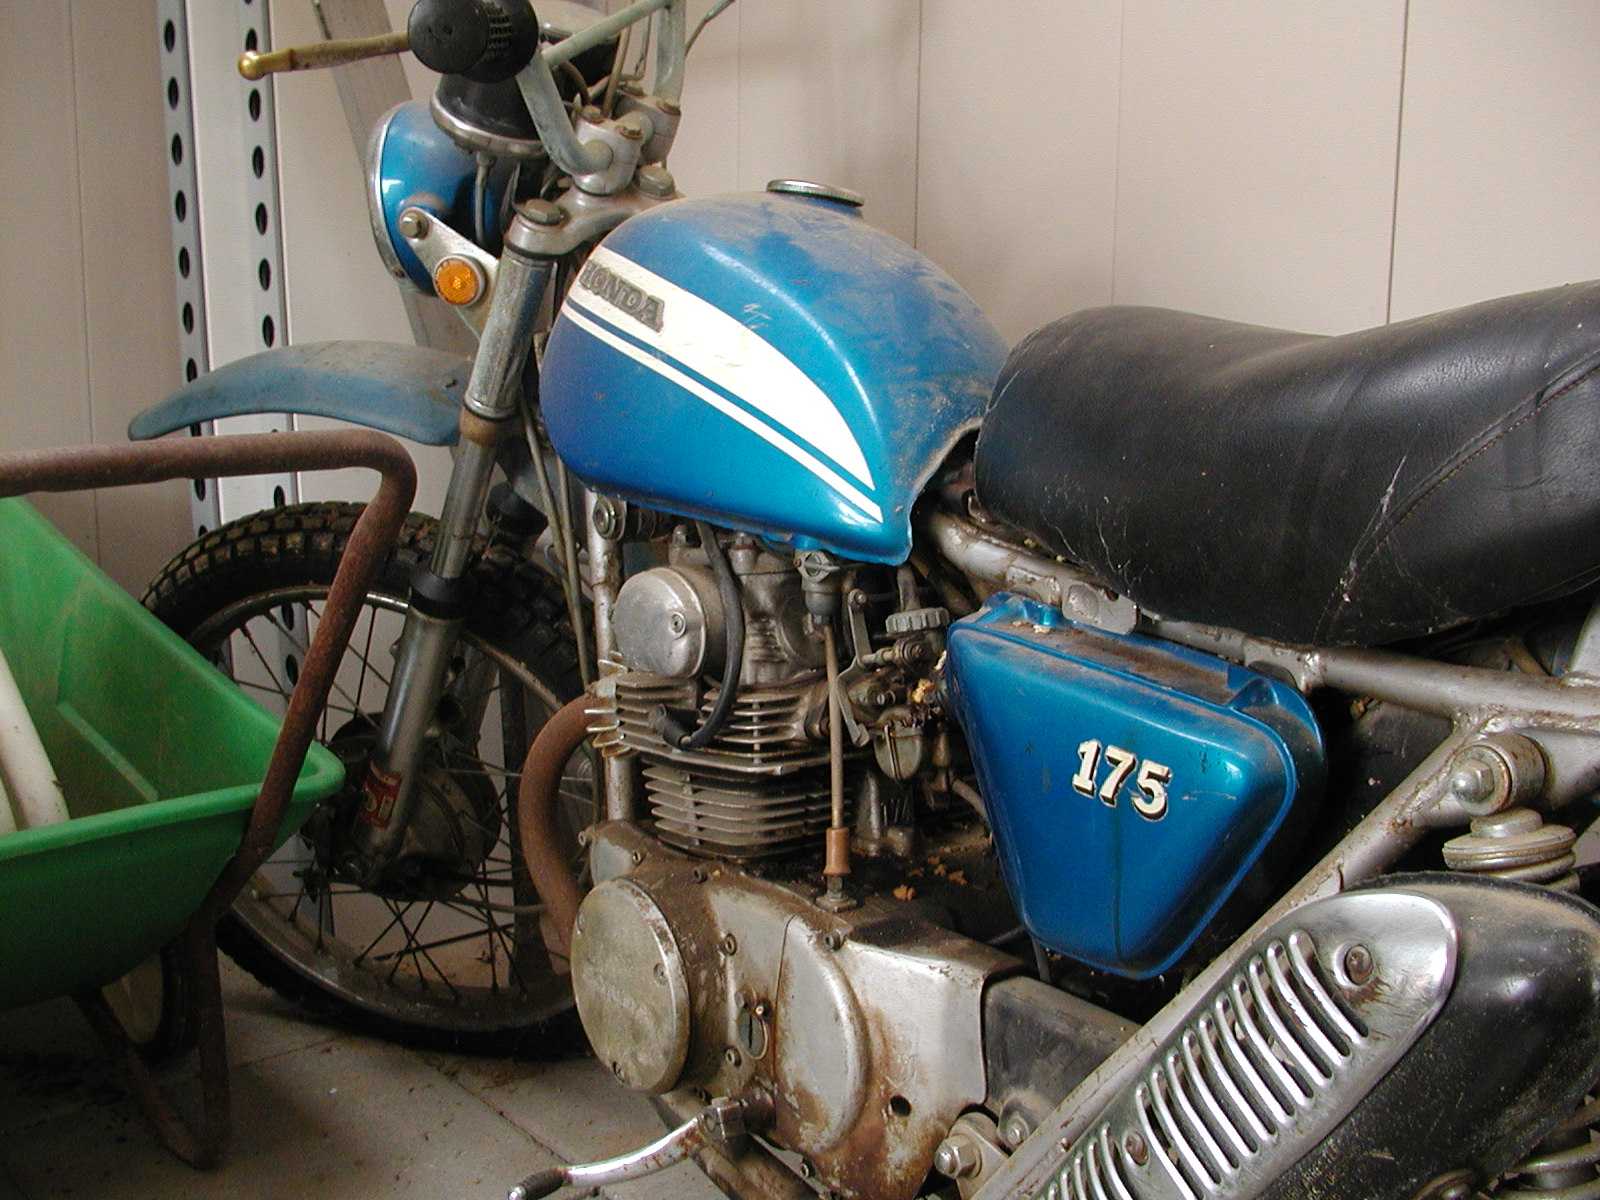
As you can see from the picture, it was in very good cosmetic shape. The front fender had been repainted, and there was lots of dust, dirt, and oil residue. This oil residue may have been what helped to save so much of the exterior metal parts from corrosion. Maybe Honda made those substandard paper gaskets for a reason after all!
The first task was to talk Don into giving me a crack at the project. I think there is certainly a lot of sentimental attachment to the motorcycle for both Don and Marcie. If there hadn't been, do you really think they would have been hauling it around for the past 35 years each time they moved? They tell me that at one point early in their marriage, it was their only mode of transportation due to damage to Marcie's car. I also had Don's sons to convince, considering that they would probably be next in line so to speak. Scott is still in school and seemed to want to encourage me to fix it up, and Ross is too far away to come and get it. I think in some ways they probably both think that they will be more likely to get to ride it sooner by letting me work on it than if it just sits for another 5 years. Finally, I had to have a place to work on it, and considering that for over a year I had not had any place to call home at all, much less a place with a shop, that was going to be tricky. Luckilly I was able to change work schedules to be mostly in the same place, and was able to find a living arrangement that accomodated such a project. On that note, if you are thinking about a career in the airline industry, I hope you like to travel! That seems obvious, doesn't it? So anyway, I bought the Haynes manual from England on ebay, and started learning. (By the way, the books that they sell in England are different than the ones here... did you know that? I didn't!)
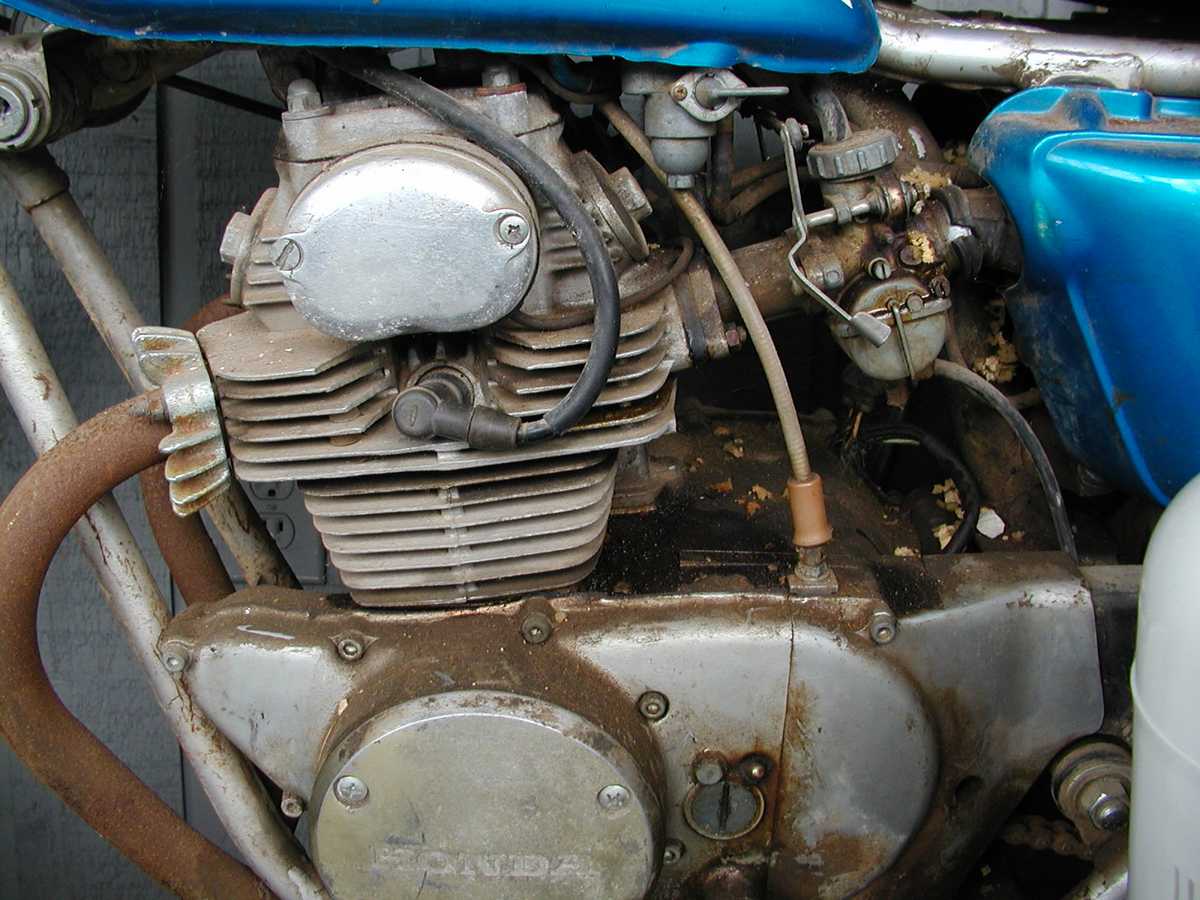
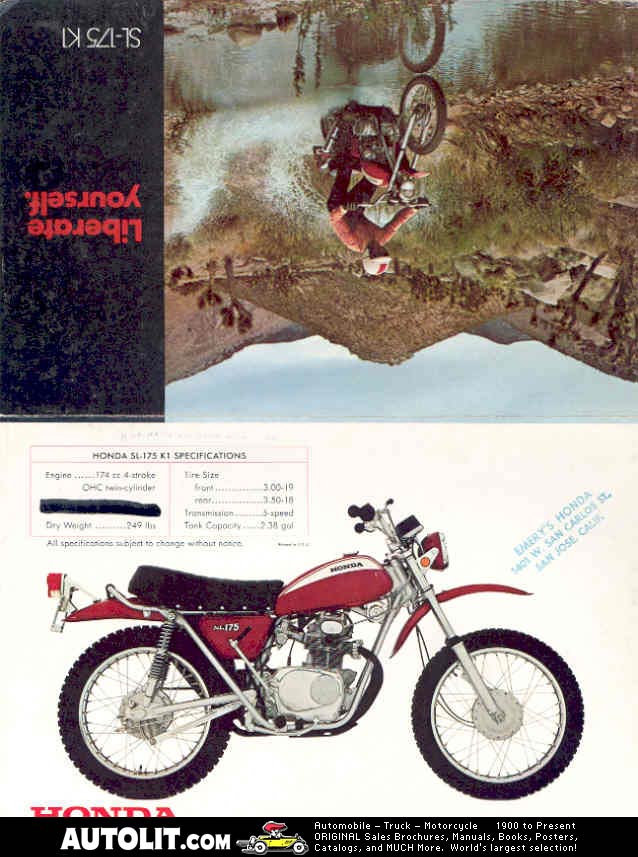
The next challenge was to find out what kind of motorcycle this is. It isn't much of a challenge to you, since I've already told you, but it certainly led to a few hours of research for me. My first guess was that it was a CB175. I searched ebay for "1970 Honda 175" and saw a blue CB in an auction. It certainly had some differences, like turn signals and a different exhaust, but I attributed those differences to customization, and figured it was a CB175. Later I saw an auction for a CL175, which was the scrambler version. My uncle and I agreed that it must have been one of these because of the knobby tires, but it still had a totally different exhaust. It also seemed odd to me that the serial number would start with "SL175" if it were a CL. So do I sound like an idiot yet? When I found out that there was such a thing as an SL175, this was obviously it. The dead giveaways to spot an SL are the 45 degree muffler, the absence of turn signals, and the knobby tires. More subtlely, it also lacks an electric starter, has a different air cleaner, and the fender is painted to match the rest of the blue parts.
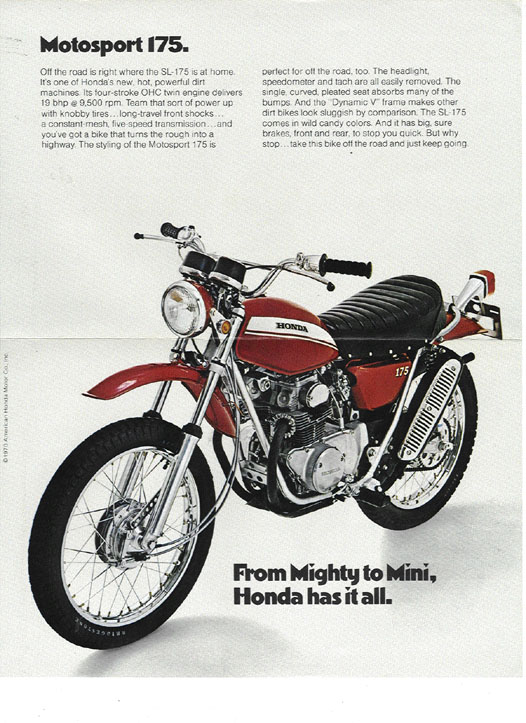
In my research, I came across a few of these pictures. These are borrowed from ebay auctions, and to the sellers, I send my thanks for your fine contributions. The sales brochure apparently only showed the red version, though I've seen both colors in equal proportions on actual bikes on ebay lately. I'm not sure about the orange color... that is the only one that I have seen so far. Maybe it isn't stock, or maybe they are just less common. In any case, these pictures give me an idea of what it was like under the best of circumstances.
4-2008 Update: In 1970, the color choices were Blue, Red, and Orange. In 71 they swapped the Orange for a Goldish-Yellow. There is a fine example of the red one at the Barber Motorsports Museum in Birmingham Alabama.


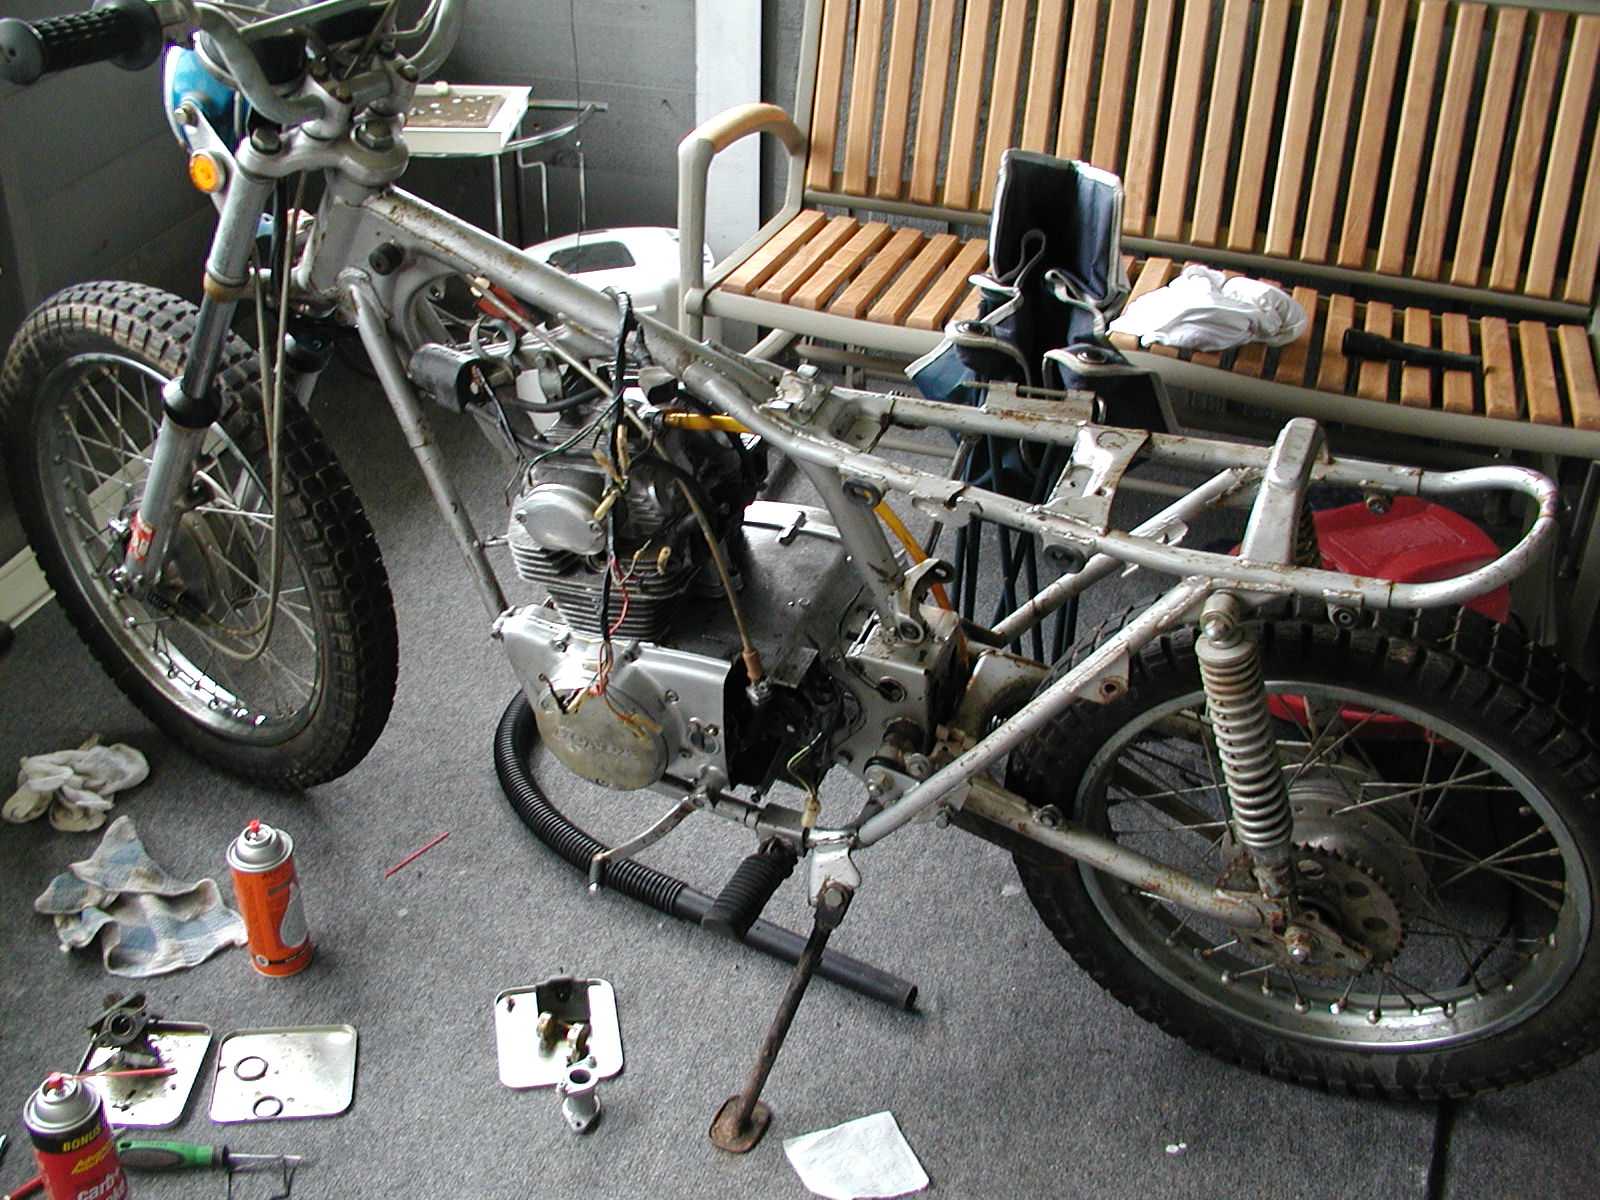
With that little bit of difficulty out of the way, I was able to start pricing parts. For a few weeks, I watched auctions for anything that matched a title search of SL175 or Honda 175. I learned that the majority of the parts that I would need would be fairly inexpensive. Up front, I knew that I was going to need a new battery, a new clutch lever, new intake tubes, and several other minor things. I finally got moved in to my new place and got the other more pressing things out of the way (like unpacking a few things) and was all set to get started. One evening I took to work with a few metric tools and a king-sized can of AeroKroil (penetrating oil). After just a few hours, I had a box of parts and a big mess.
First off was the seat. You can see lots of little pieces of foam from where a creative mouse found a perfect place to set up his own little home. He chewed out a section of the seat's foam about the size of a grapefruit from the bottom up. He was incredibly safe there, since the only way in was through holes just big enough for a mouse to get through. That is, unless someone were to sit on the seat. I certainly wanted to get the battery out first and get it isolated, since there was no telling what was going on with it. As you can see, it was like the desert in there, so my worries of spillage were overrated. One air cleaner still had the remenants of an element, while the other was thankfully clean. That brown powdery stuff is all that was left of the one element, though it vaccuumed off nicely with the shop vac. I couldn't find a specifically cut filter anywhere, so stopped by the local Honda shop to see if they had any of the bulk sized sheets of foam to cut new ones from. The ambitious clerk said "no, we don't have that, but I'm sure we can find a filter for it!" So I said "Sure, ok, why don't you just find a filter for it?" After a minute or two of exhausting his verison of the catalogs that I had already exhausted on my own, as if he didn't believe me, he set out to look up a Honda part number on his computerized microfiche. He said that they actually had three of the Honda version in stock, which certainly surprised me. I asked how much they were, and considering that they were $19 each, they must have been made out of foamy gold sprinkled with magic racing dust. I wasn't interested at all in buying them at this price, but he went back to the back to get them anyway. He came back with two bags that must have had the foamy gold removed, because they were nothing but the same brown dust that you see in these pictures. Who knows how long they had been on those shelves... maybe 35 years just like the one that I already had.


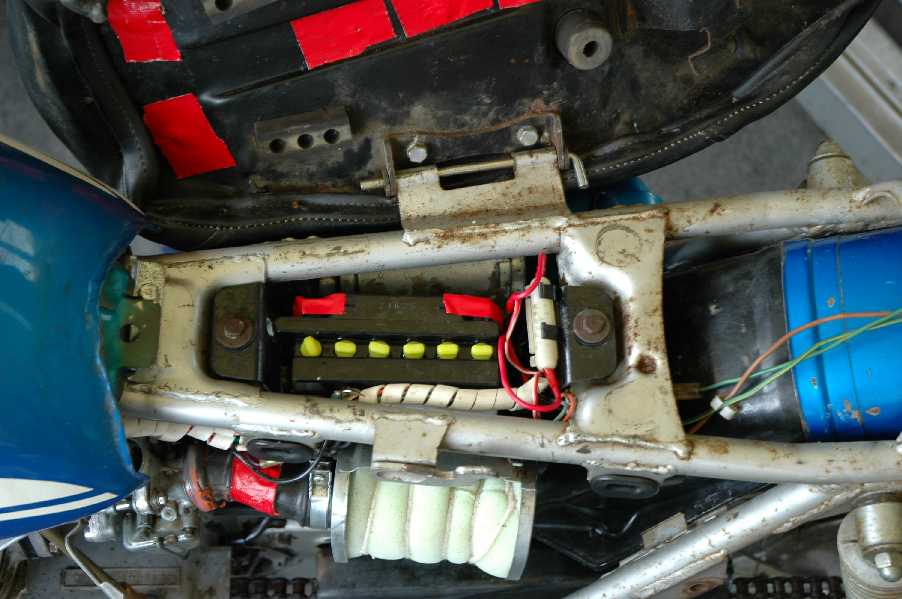
One unfortunate miscalculation that I made with this whole project is that the bike was parked just because they got tired of riding it. I figured a little cleaning and replacing the parts that fell victim to rotting and corrosion would get it back into running shape. Another explanation that makes a whole lot more sense is that perhaps they stopped riding it because something was direly wrong with it. Don probably parked it and said, oh, I'll [insert appropriate phrase: fix that lever, find that short, rebuild that engine] later, and just never got around to it. I found one small hint of this concept when I opened up the fuse holder to find not a fuse, but "the fuse that never blows" as shown in the picture. I also found a few other small hints like stripped screw heads here and there that reminded me that Don was a lot younger when he was last working on this thing. But either way, I went to bed that night knowing that I had just turned one piece of motorcycle into a pile of parts. I waited until the next morning to get a few daylight pictures of my work.
4-2008 Update: I have to make a correction in Don's defense here. One time a couple of years ago we were at the annual family gathering around Thanksgiving, and I was talking with Don's older brothers about the condition of the SL's electrical system. I told them that it appeared that Don had bypassed the ignition switch at some point, and his brother Bill said "Well, maybe that was one of us that did that. He had left it in the barn for quite a few years." I've since been to that barn, and sometime I'll have to post some pictures of it so that you can put the whole story in context.


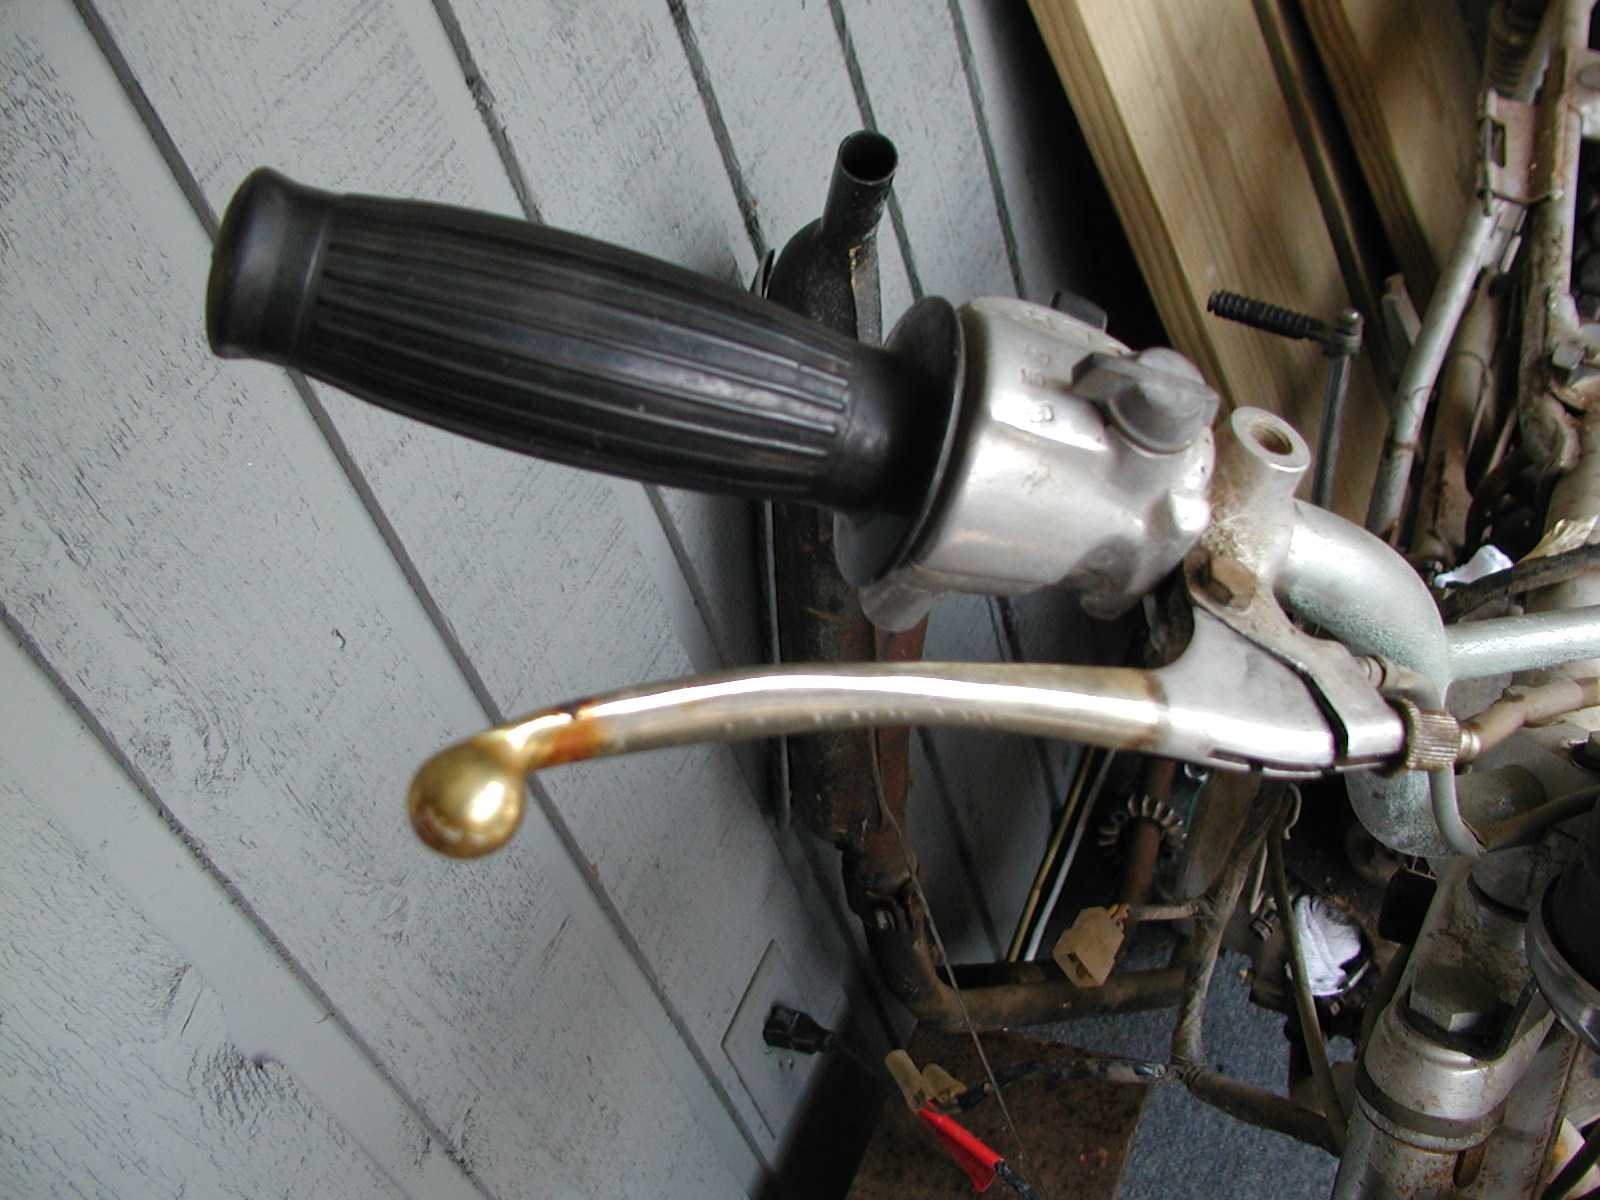
At some point over the years, one of the levers was broken. I was to a point with the project where I wanted to take it outside to scrub off some of the years, and I figured that a front brake would be handy in going down the stairs. I guessed that the levers would be interchangeable, and I guessed correctly. In fact, it seems that perhaps the one existing lever was actually a brake lever from the start, since the hole for the cable end was on the bottom when it was on the right side of the handlebar. From the pictures you can see the remains of the old lever.


To the average homeowner, taking the frame/wheels/engine combination out for a scrubbing wouldn't be a monumental task. But, to the second floor condo dweller, it is easier said than done. Since I didn't have the luxury of an outdoor water source, I was going to have to push the bike to the nearest coin operated car wash, about a half a mile away. I also wanted to take a box of parts though, and there isn't a trunk on this particular motorcycle. My solution was to drive the car full of parts and foamy Gunk to the car wash, walk back, push the bike to the car wash, wash it, push it back, walk to the carwash, get the car, and then drive back. Did you follow all of that? It was ingenious, I tell you. That is, except for my list of things to take with me. Do you see quarters in that list? Did you just assume that I would have taken quarters (aka coins) to the coin-operated carwash? I did, and unfortunately, I left them in a little bag at home. This put me in quite a delima... I didn't want to leave the bike alone while I drove back home, since I was afraid that someone would steal it (or take it to the dumpster). I managed to find enough money in the car to run the pressure washer once, and while I would have rather had another two rounds, it amazed me how well the cleaning actually did go. The final piece in this whole operation's puzzle was to get the bike back up the stairs, and while it is a fairly manageable task for two people, it is impossible for one. The published empty weight for this one is 249 pounds. Luckilly Phil came through to help me with that step. It also happens that I put one mile on the odometer, which I'm glad to know works.


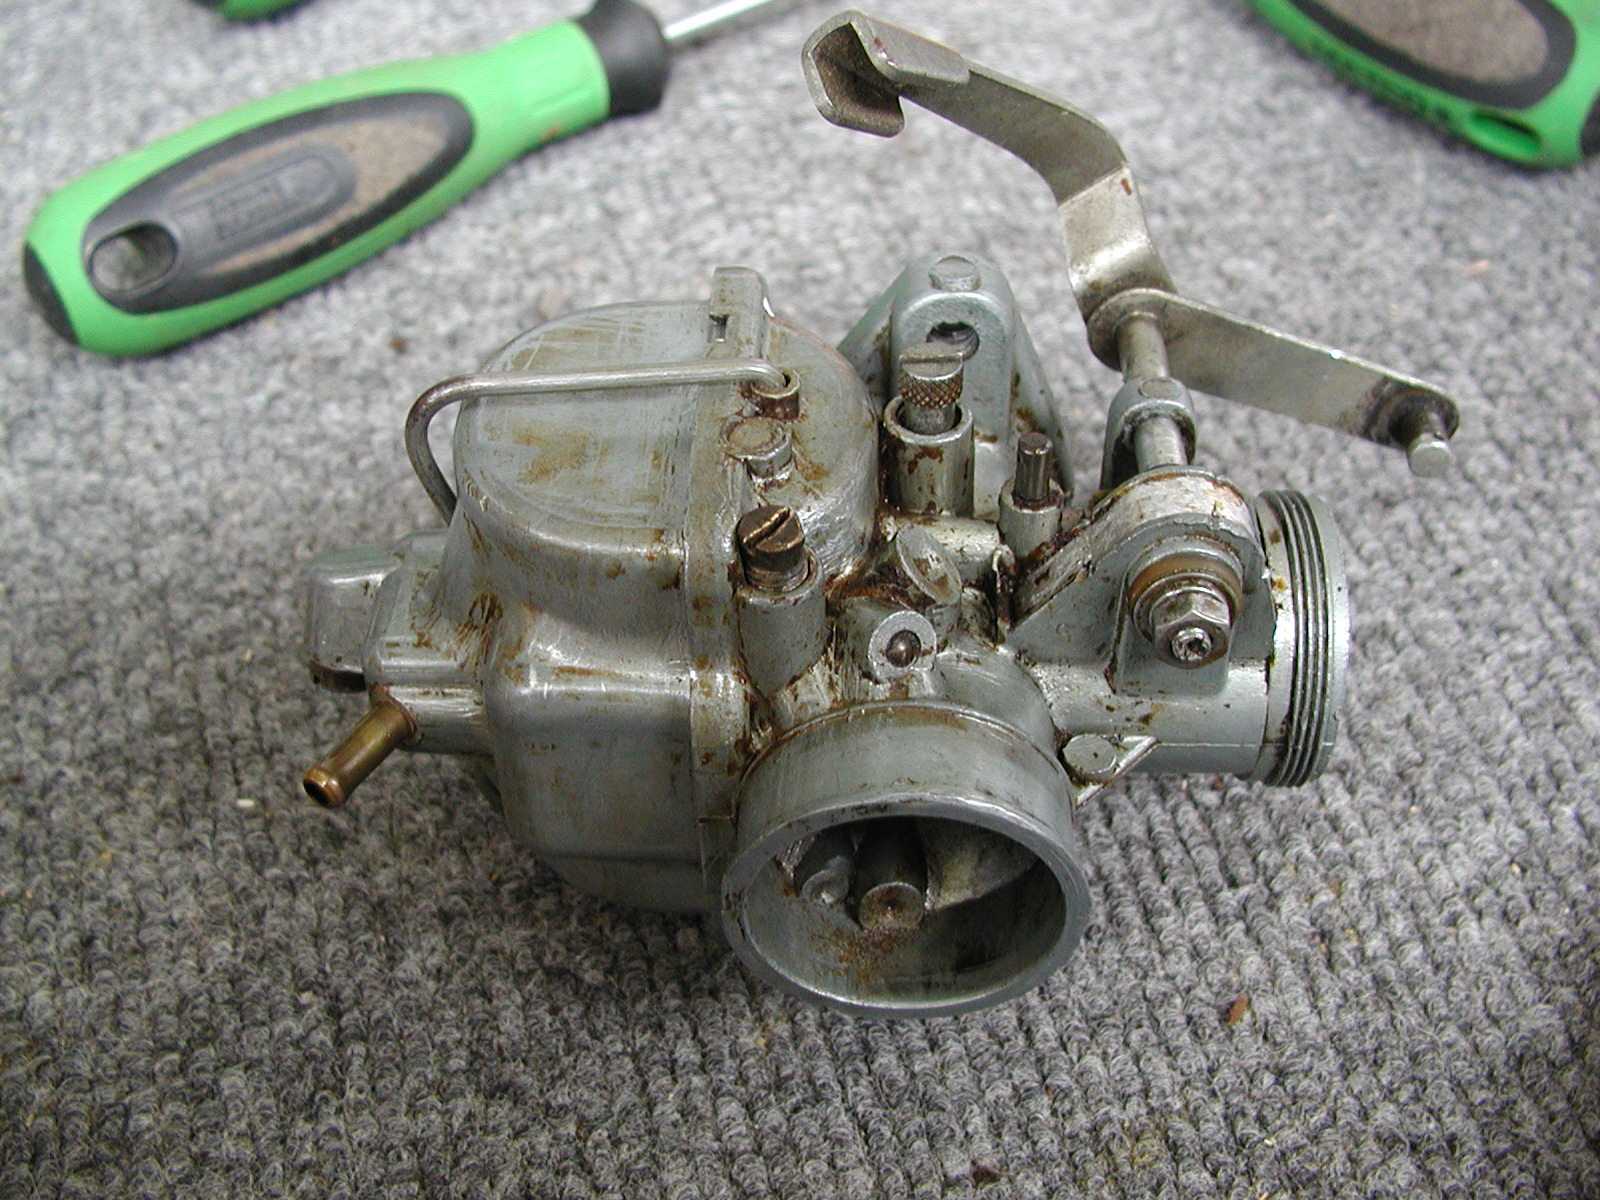
With the general cleaning out of the way, I started the more intricate cleaning. Since this bike has two cylinders and two carbs, I had the down side of cleaning two, but the benefit of having one to use as a model for reassembly. The manual that I have had good diagrams of the pieces too. A set of two carburetor rebuild kits seems to run about $30 on the auction sites, and it seemed to me that they weren't really necessary. Of all of the little jets and needles, none of them had any ridges or wear that I could detect, and the only real benefit to using the kit would have probably been in the gaskets. The old gaskets were in good enough shape that I just reused them. Each of these carbs involved about a day's work of spraying, scraping, picking, scrubbing, rubbing, and otherwise removing the caked on varnish that had separated from the gasoline. Imagine something like a candy coating on all of those little parts... I was glad to see that the solvents in the carburetor cleaning stuff made it much easier to get off. Hopefully I got all of the little ports and holes clean. I guess I'll find out when I try to run it!
4-2008 Update: In retrospect, the carb kit would have been worthwhile. I ended up buying them shortly after I wrote this, because the gaskets that "looked good enough" were indeed not. It turns out that the kits that I purchased had the wrong jets, and that made for some confusion later.


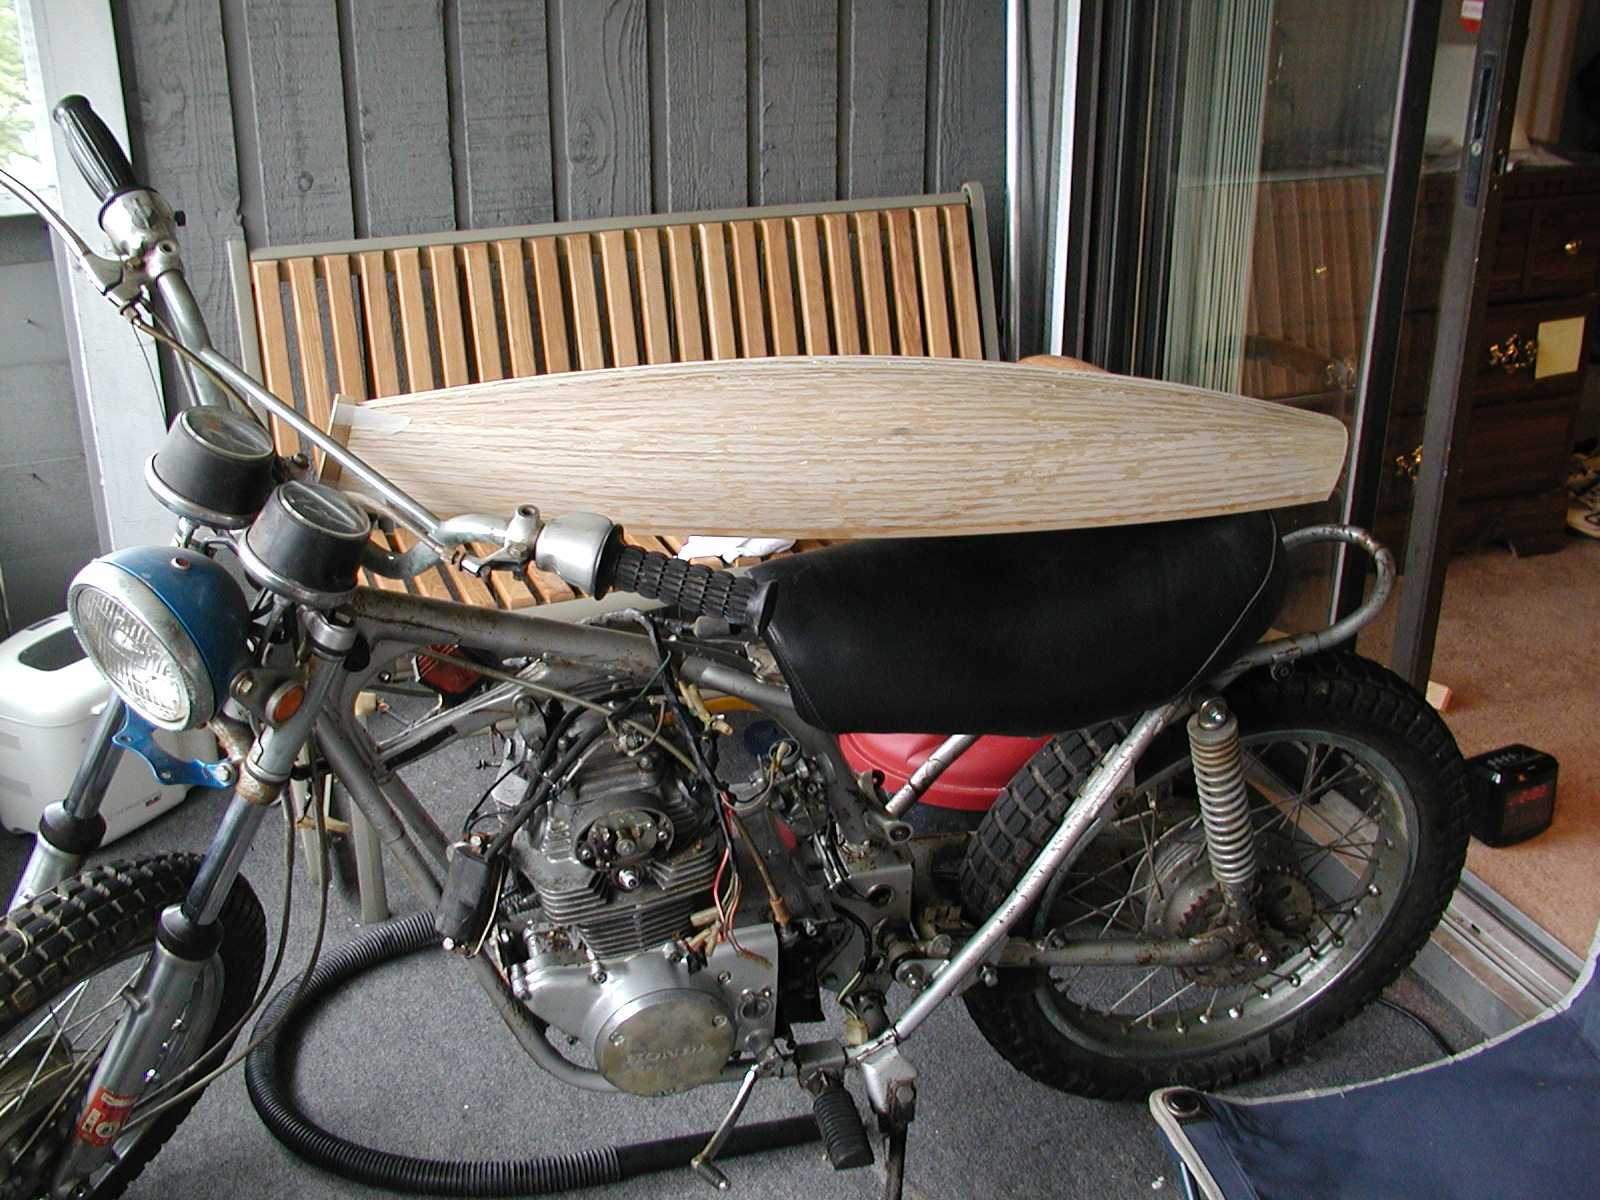
With that weekend's work out of the way, I took a good look over everything. You can see a few more examples of the stripped screws around the ignition points. The wooden part is a sailboat hull, which is my other pending project.


Since I ran out of quarters at the car wash, I wasn't able to wash the box of parts that I so carefully took over in the car. Instead I made a monumental mess in the bathtub by cleaning them at home. I guess it is a good thing that I haven't finished remodeling that bathroom yet! A little bit of wet sanding yielded a hint at the original blue paint under the recoat on the fender. The cardboard is the shade of blue that I planned to use to repaint it. I'd say it is a pretty good match to the honda blue, and considering that it is available in the hobby section of Wal-Mart, it couldn't be beat. It is Testor's saphire blue metal flake in case you are interested. The finished product is the third picture.
4-2008 Update: Speaking of a monumental mess, I also used that same shower to wash the engine as I disassembled it. That made much more of a mess than the parts mentioned above. Regarding the paint, Walmart has stopped carrying model kits and supplies in most areas, but you can still find the paint in hobby shops. The match is pretty close, but not exact. I've since learned that the original Honda paint system involved several layers. One was a silver metalic, and it was followed by a transparent blue in this case. I've read that this process is difficult for an expert to reproduce and nearly impossible for a hobbyist to reproduce faithfully. The spray can is good enough for me on this project, but it doesn't have the same visual texture and metal flake depth as the OEM process.


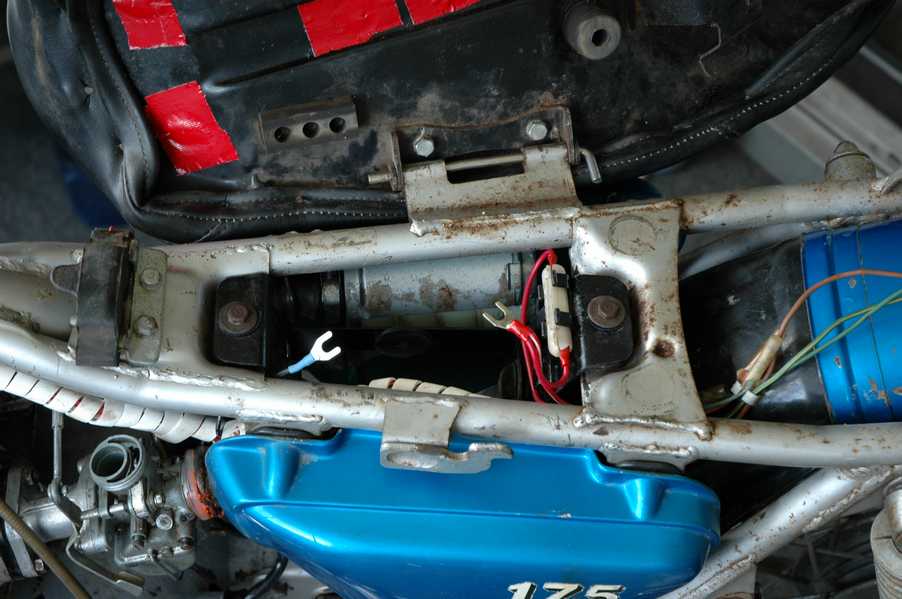
The wiring harness was an inevitable project, so I started on it next. The primary wire that connects the ignition switch to one side of the fuse was burned in a few different places, so I replaced it. Since the ignition switch's wires were merely bare copper twisted together, I soldered them more neatly and rewrapped the whole thing.
4-2008 Update: I just recently removed the remainder of the original wire harness jacket. It was so hard from age that it was forcing the wires to all flex in one spot whenever I turned the handlebars. I replaced it with a spiral wrap like the one pictured below. I would strongly suggest that you do the same if your wires are also flexing in one concentrated spot.


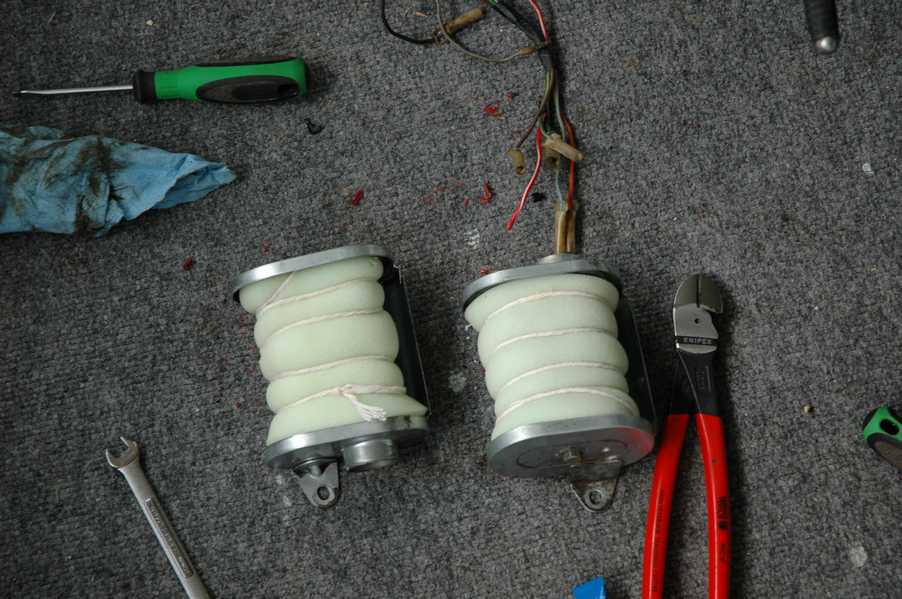
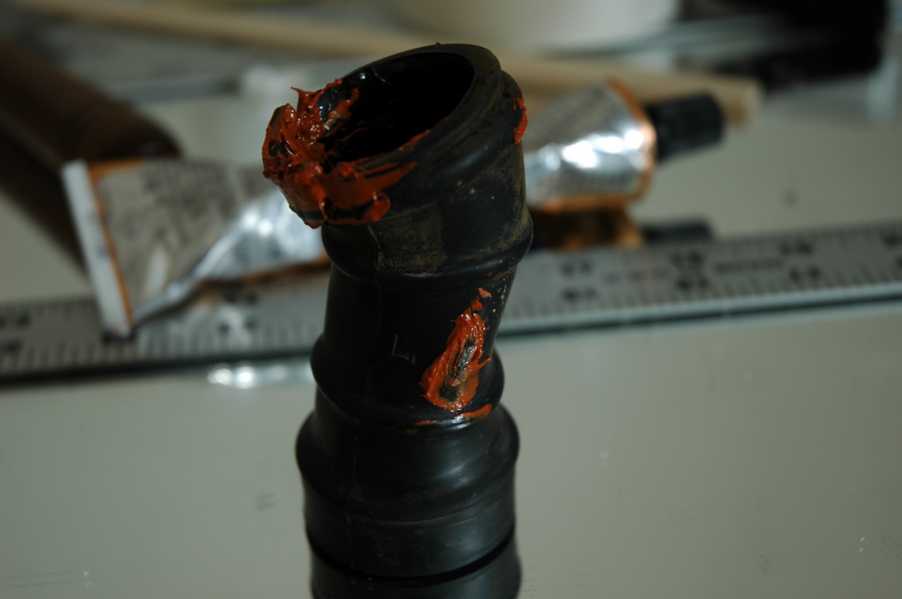
The intake system was going to need some work, since one of the rubber boots was cracked, and since the previously described air cleaner elements were out of commission. I couldn't find any local motorcycle or lawn equipment shops that carried a bulk foam sheet to cut filters from, and I was just about to order the foam when I had a better idea. It turns out that a shop vac filter element is big enough to cut down to size, and they are also locally available. I used a little bit of cotton string to tie the foam on, since it was a rectangular piece that needed to be a ring.
4-2008 Update: This is still a problem. I never could find any good rubber tubes, and the silicon that I used to repair the old tube was separating and entering the carburetor. This was no good, so I decided to switch to a Uni pod filter. I still haven't established a good idle mixture since then, but I have decided that my idle problems are not related to the UNI filters exclusively. Stay tuned for more.


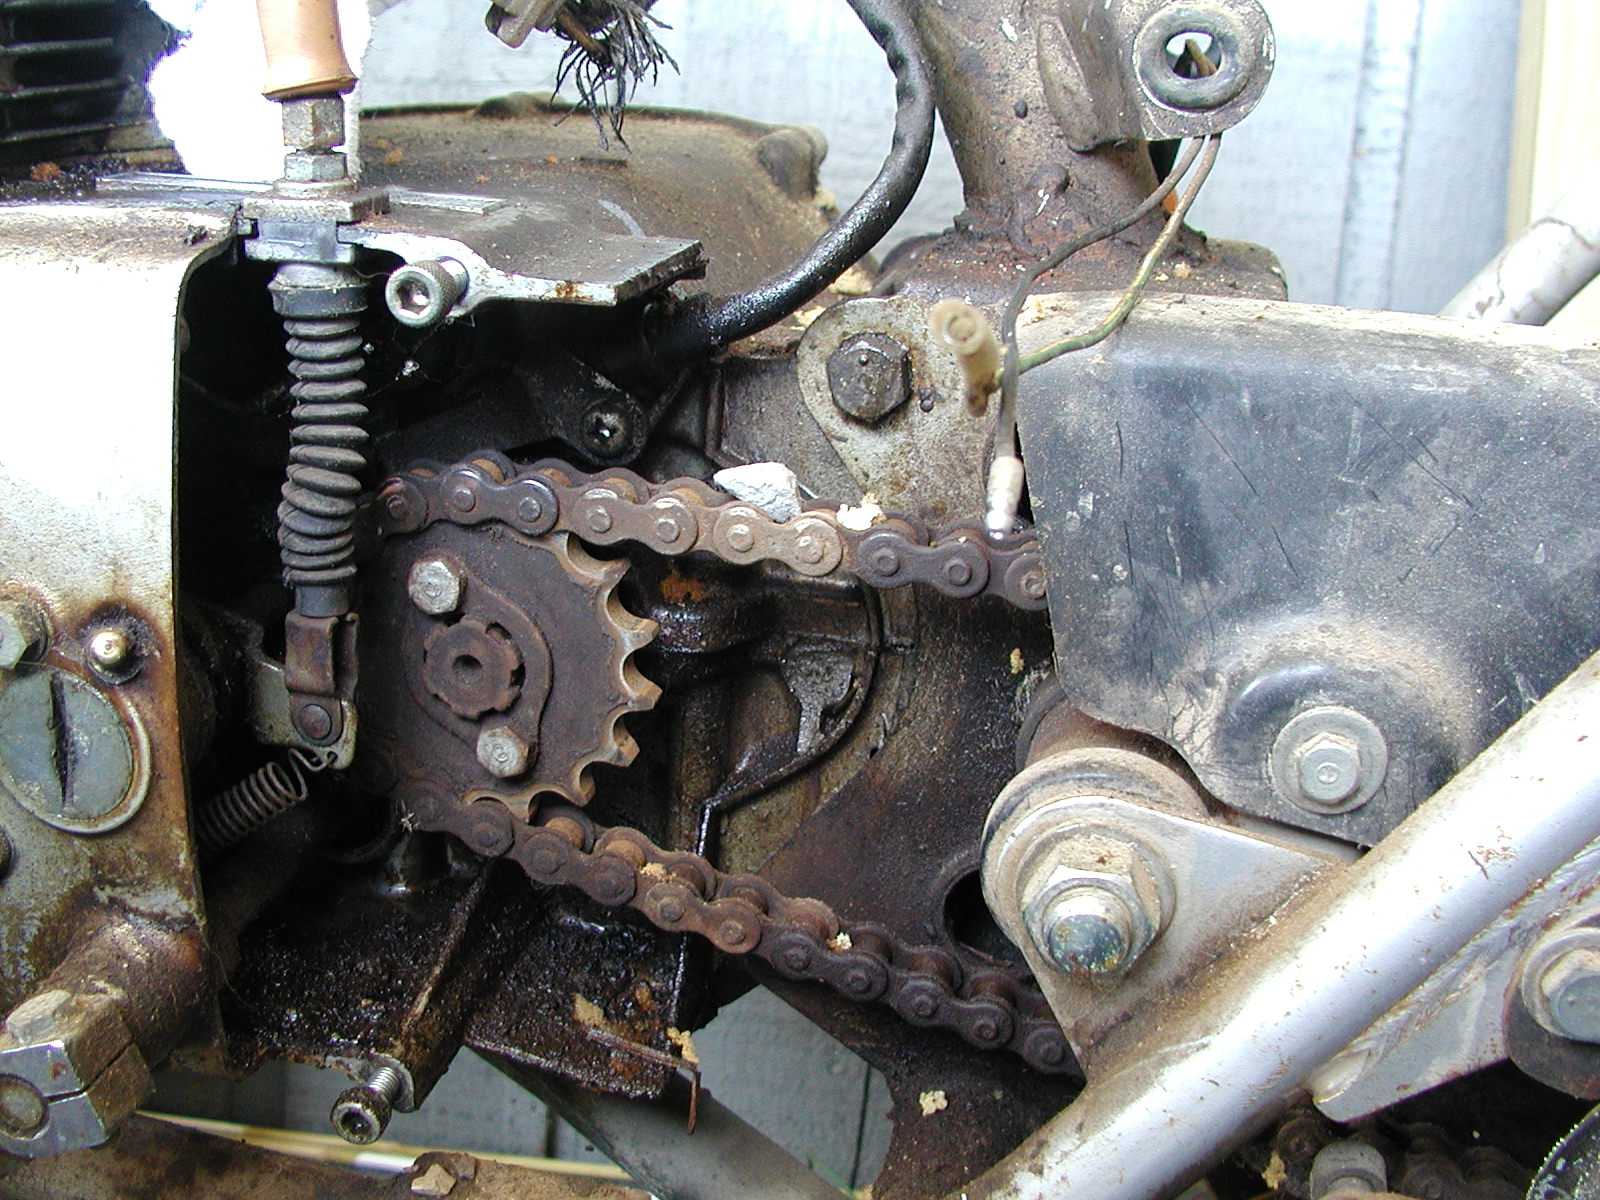
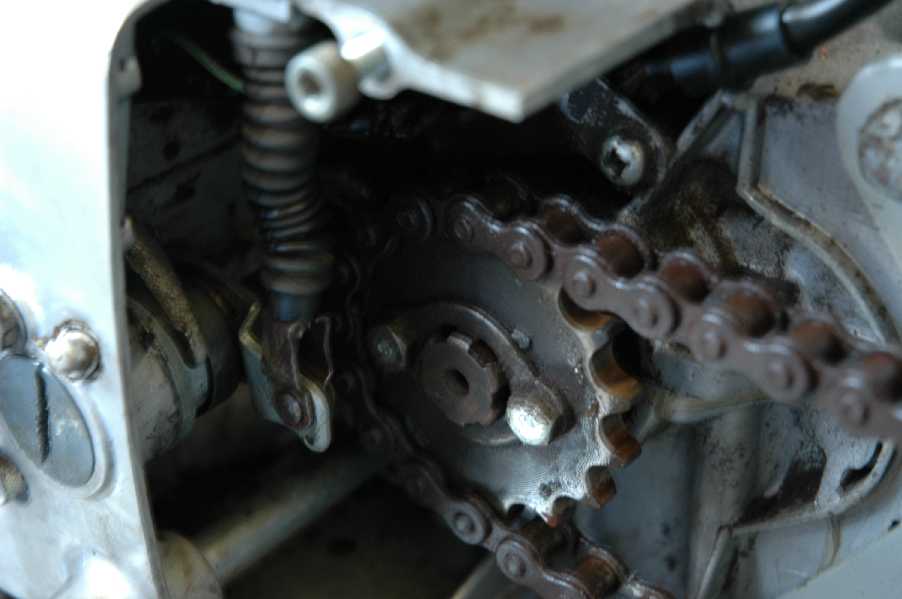
The rest of the work was pretty much just a matter of putting on the pieces that I had taken off. I got most of it back together, including the chain, before I realized that the clutch wasn't really working. I could put the bike in gear, pull the clutch lever, and yet couldn't roll without the engine turning over. I knew it wasn't a cable problem, since it was appropriately actuating at both ends. I was starting to get worried, since working on the clutch at all would essentially involve removing and taking the engine apart. In one last effort I put the bike in 5th gear, pulled the lever, and rolled it around some. This actually made things much better, and while the clutch still drags a little, maybe it will get better with more use and wear.


 It runs! At least on one cylinder. After some substantial kicking, it started to fire occasionally. Finally, it would fire a few times with each kick, then a few more, so that it would run for a few seconds. Within the hour it was running steadily at around 2000 RPM, and I even rode it around the parking lot a bit. The only trouble is that it was really sensitive on the throttle at the low end, and as I later realized, was only running on the left cylinder. I got a storage place for it so that I didn't have to lug it back up the stairs and through the living room, and I have since put some time on the engine in putting around the parking lots. I actually didn't even realize that it was only running on one cylinder until I started disconnecting spark plugs to make carb adjustments. For some reason I just couldn't get it to run with the left lead off, but when it ran the same with the right lead off, I had found the culprit. The plug is firing, so I took off the right carb to go back through and make sure that it doesn't have any debris that I might have missed on the first try. I also got my motorcycle learner's permit today, so it won't be long before I'll be terrorizing the streets.
It turns out that the right cylinder was just a little bit slower on getting back into the mood to run after sitting for so long. I addressed a few problems with the spark plug and its inadequate threads and made some throttle cable adjustments, and now it is running much better. The best indicator for when the second cylinder was running or not was the exhaust pipe, since it looks different when it is hot. With almost 40 miles of putting around, the engine had settled down quite a bit. I started the process of getting a license plate as soon as I got a title, and it took about two weeks. Since the old serial number doesn't satisfy modern vin requirements, I had to have a local official come by and personally inspect the stamped number to be sure that it matched the title. The inspectors were nice enough, but they are understaffed, and their office hours are ornerous. On top of that, I've been in and out of town, and my schedule just didn't seem to compatible with the local license plate office. Finally, I had everything in place to go on a sunday (and of course, they aren't open then), so I passed the waiting time by riding around the parking lot more. The engine and clutch were really working better than they had ever before, which convinced me that after getting a license plate I was at least mechanically ready to go ride on the streets the next day. I was at the office when they opened on Monday morning, and as soon as I got the plate I went out to put it on.
I knew that the bike was running a little low on fuel, so I figured I would use the reserve setting to ride to the gas station and fill it up. After all, the last thing I wanted was for it to quit in traffic. I started the engine, which is still a little reluctant to run well until it warms up. Even though it wasn't quite up to it's best running conditions, I figured it would warm up on the way. So I set out to ride down the street to the gas station, but was surprised at how little power it had. The engine was sluggish and was popping and sounding horrible so I pulled off the road to look things over. I couldn't see any major stuff loose, but it became pretty obvious that the left cylinder was cold. This was immensely frustrating for several reasons. First, it was the only one that was running early on, and it had not given the slightest indication of any problems. Second, just the day before, it was running flawlessly. Now I finally had a license plate and I didn't have the power to make it up the hill to get to the gas pump.
I figured that the reserve petcock setting must have been to blame, since that was all that had changed since the first day. Maybe some little flake of rust dislodged in the gas tank and was floating around waiting for me to select reserve, which draws fuel from a lower point in the tank than the standard run setting. If it had plugged the fuel line to the left carb, or perhaps some important passage in the left carb, that would explain this sudden change in behavior. I removed and disassembled the left carb again, but didn't find anything obvious. I figured I would check the plug to make sure that it hadn't been shorted by some random piece of debris, but it looked good (well, as good as a plug can look when it hasn't been firing for a little while!). I removed the plug and tried to see if the engine would run on the right cylinder in that condition, and was pleasantly surprised to see that it did. This was especially good news since the haynes book describes a carb tuning method that requires isolating each cylinder, and the entire procedure was useless to me because I couldn't get the engine to run with one plug out. Luckilly this seems to be one of the benefits of the recent running time. So anyway, I grounded the threads of the plug to the engine case and watched for a spark. I was surprised to see that the plug wasn't just sparking where it was supposed to, but was also arcing all around the porcelain area down in the plug. This didn't seem like a healthy thing for a plug to do, so I replaced it with another new one. The plug would have been my last suspect, since it was one of the few parts that I have actually replaced myself. But sure enough, $1.83 later, I was back to normal.
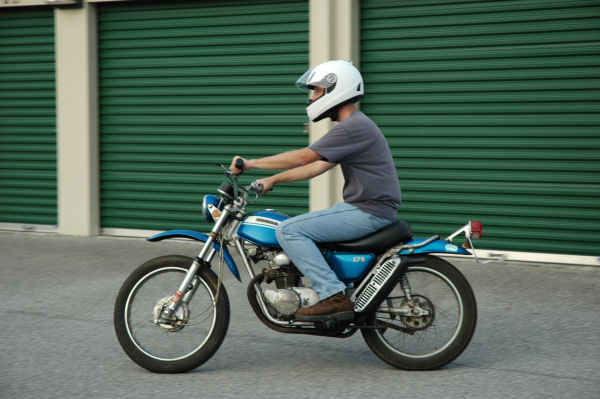
Having a newfound excitement and confidence, I left the comfort of the parking lot to go cruise around the big scary streets. I found myself behind a line of cars at a stoplight, and in order to keep up as I followed them, I found myself accelerating fairly rapidly and in 5th gear at about 45 mph. Gee, I thought I was going fast, but I was barely keeping up with them. I guess years of riding a bicycle have distorted my sense of two-wheeled speed.
In my regular browsing of ebay for parts, I came across a november 1970 issue of Cycle World magazine. It turned out that the seller was in the same town that I was visiting, so I arranged for a local pickup and bought it. I thought it was an especially interesting issue, because in addition to all of the amazing differences and similarities of a 35 year old magazine, it included a review of the SL175. Furthermore, it included a review of the Kawasaki 175 Enduro, which I believe is the same kind of motorcycle that my dad had back then when he was about my age. The article pointed out that the power band for the little honda twin was at a higher RPM than most single piston engines, and as a result, many riders tend to not let the engine rev high enough to make the most of the available power. I took this advice to heart and have since found that the engine does seem to respond better by letting it wind up a little bit more.
4-2008 Update: Regarding the Magazine... it turns out that my dad had a Yamaha 175, not a Kawasaki. Furthermore, I cut out a couple of ads and ended up selling them for more than I paid for the whole magazine.
So this pretty much brings phase I of this project to an end. In a way, I knew that I wanted to make an orgainzed effort that could be easily divided into phases, and I knew that the first phase would involve making sure that the engine was in good working order. I have decided in retrospect that my goal for the first phase was really to evaluate the project to convince myself that it is a viable effort. In that sense I have certainly suceeded. I've found that the major components are in good shape, the beaurocrats aren't going to keep me from licensing it, and best of all, I've learned enough about the history of the model to know that it was a fascinating machine back when it was new. I would like to think that I would have been interested in buying one if I was shopping back in 1970, because it is a great balance of economy, reliability, street legality, and trail capability. It is fascinating to think that the bike that essentially found me is one that I would gladly have sought out to find if only I had known about it sooner.
The project continues! Click here for Part 2